By: Valeria Herrera
*All photos taken by me.
For this weeks fun DIY project we will be taking an old pair of jeans right from your closet and converting them into cute mini denim backpack. It is such unique idea that I had so much fun creating it. This bag is meant to carry small on the go essentials, such as your keys, wallet, cell phone or favorite makeup. The best part about it, it involves little to no sewing. Follow along to find out how to make this creative item yourself!
Here’s what you will need…


A pair of jeans ( any style works as long as they are full length), patterned piece of fabric, lace, fabric glue or hot glue, marking tool (color pencil), scissors, measuring tape & pins.
Optional Tools…


Sewing needle/thread and seam ripper
WARNING!
Do not discard of any of the fabric after cutting. Mostly all sections of the jeans will be used. Throw away the scraps after the DIY project is completed!
Preparation:
You will need to cut out the pieces for the backpack before getting started.


You will create pieces #1-6, a total of 10 pieces all together. ( e.g. #1 is 2 pieces, #6 is 2 pieces, etc).


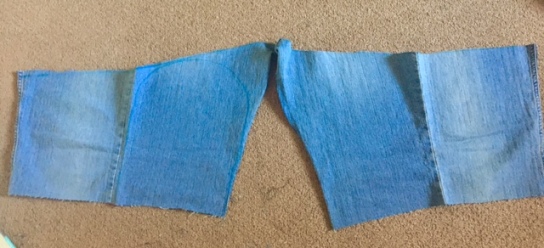
Measure 16 inches in length from the hem of your jeans. Before cutting the piece, its preferable to pin the hem together for each jean leg so that the back doesn’t move while cutting.


You will then cut the side seams and the hem of the fabric to create rectangular pieces. Try to cut along the the seam of the fabric, don’t cut through it because you will later need to use the side seams for a step. Once you remove both seam & hem, try to make your pieces into rectangular shapes as much as you can. It should be around 15″L x 13″W, but it can vary by the shape of your jeans. These will be pieces #1. The side seams will be pieces #6.


Taking the remaining part of the jean, cut along the inner seam of the pants all the way up to the zipper. Then, cut around the zipper all the way up to the top of the jeans.

Using your scissors or seam ripper, carefully remove the pockets from the fabric. Set them aside for later. They will be pieces #5.


2 strips of fabric will be cut from this part. Each being 3 inches in width, length will vary from side of the fabric to the next. These will be pieces #3.
Using the last remaining part of jean, you will be creating the flap and the bottom piece of the backpack.


On one side of the fabric create an arch shape to create the flap of the backpack. It should take up most of the fabric. Once cut, place on top of your patterned piece of fabric, you will need to recreate the shape onto the fabric. Pin it in place so it doesn’t move. Allow for an extra 1 inch around the jean fabric that will be fold over. This will be pieces #2.


Finally, using the last remaining fabric outline an oval and cut it. This will be pieces #4.


Pieces #5 and #6 will be the pockets and side seams removed from the fabric.
Step One:


Taking “pieces #1,” place right sides together (one on top another). Place glue on the length edge on one of the right sides and press them together. Make sure to leave a 2 inch gap towards the bottom of the fabric (about an 1 inch away from the bottom). This is where the straps will be placed. Repeat the same step on the other length side of the rectangle pieces. It is easier to flip the fabric “inside out” so the right sides are once again facing each other.


For a flatter surface, glue down the newly created edges seam onto the inside fabric, so that it is not sticking out. Set it aside so the glue dries.
Step Two:


This next step, you will glue “pieces #2” together. With the pieces placed together (wrong sides together this time), place glue on the edge of the denim fabric and fold over the 1 inch patterned fabric and press the fabrics together. It should create a border around it.
Then, place the lace on top of the patterned fabric so that it is around the flap. Make sure not to place lace on the top of the flap. Pin the lace in place. For this step you can use glue or, if desired, sew the lace onto the fabric for extra security.
Step Three:


Using “pieces #3” you will create the straps for the backpack. Fold and glue down the sides the fabric inwards at about 1- 1.5 inch each side. The width of the straps should be around 3 inches. Place pins to help hold down the folds while the glue is drying.


After allowing the straps to dry, place one end of each strap through the 2 inch gap hole, you made in step 1. Pull the fabric all the way through until the desired length of the strap is created. Cut of the excess length that is no longer needed.


Glue shut the 2 inch gap pressing the fabrics together with the strap remaining through inside of the gap. You can stitch the hole together for extra security.


Place the other ends of the straps on top of the backpack fabric (right side). Pin and glue the straps at the top edge center. Then, fold about an inch inwards to the inside of the bag to create the top seam of the backpack. Glue and press the fold for a clean edge.


Using one of the side seams created for “piece 6” make a hanging loop for the backpack. Cut a medium size piece and glue it at the center of the fabric.


Place the constructed flap on top of the backpack so that both the straps and the hanging loop are under. Right side facing down. Glue the top edge of the flap to the top edge of the bag. Make sure you center it properly before gluing. Allow it to dry.
Step Four:


Using “piece #4” you will pin it at the bottom of the bag . It is easier to pin and glue with the backpack inside out. Glue “right sides” together along the edge of the oval. Make sure of that the length of the oval is facing horizontally to add width to the backpack. If you have any excess fabric remaining from shape you can always trim it off after gluing.
Step Five:


Pocket “pieces #5” will be placed at the front and inside of the bag. Put glue on the wrong side of the fabric so that the right side is facing up. Glue the 1st pocket at the center front of the bag. Next, flip the bag inside out and place the 2nd pocket in the inside of the backpack.
Step Six:


Cut out a small piece, about 1 inch, of “piece #6.” Create small loop , gluing the ends together then place the loop towards the inside of the pocket so that it is slightly sticking out.


Then, at the inside of the backpack flap, use your scissors or seam ripper to make 2 small cuts, so that you can pull the remaining “piece #6” through the constructed hole. Make sure not to cut all the way through the flap, just the denim fabric. Insert the string through the holes and glue it from the inside to keep it secure. This will create the knot closure for the backpack.

I added small piece of lace at the end of the strings for decorative effect.
Step Seven:

The final step is to place and glue lace along the straps of the backpack.
There you have it!


Your unique, personal backpack. It so amazing how we can to something old and recreate it to something completely new. Almost every section of the jeans were recycled in this DIY project. Use your creative minds and try this project yourselves!
(Twitter @vherrera7211)


")


")
")
")
")